Day 32: Launching your Kubernetes Cluster with Deployment
I am Yashraj Singh Sisodiya, a 3rd Year CSE student at SVVV, born and raised in Shujalpur. Currently residing in Indore, I'm passionate about pursuing a career in DevOps engineering. My tech journey began with an internship at Infobyte, honing my skills as an Android Developer intern. Alongside my academic pursuits, I actively participate in co-curriculars, holding roles as Technical Lead at Abhyudaya and Cloud Lead at GDSC SVVV, while also serving as an MLSA of my college.
I have a keen interest in Cloud Computing, demonstrated through projects such as User management and Backup using shell scripting Linux, Dockerizing applications, CI/CD with Jenkins, and deploying a 3-tier application on AWS. Always eager to learn, I'm committed to expanding my knowledge and skills in the ever-evolving tech landscape.
Introduction:
Welcome back to our Kubernetes journey! In the last few days, we've covered the basics of Kubernetes, from understanding its architecture to setting up your environment. Today, on Day 32, we're diving into the exciting world of launching your Kubernetes cluster using deployments. Deployments are a key concept in Kubernetes, allowing you to manage and scale your applications effortlessly.
Understanding Deployments:
In Kubernetes, a deployment is an abstraction that defines the desired state for your application. It enables you to declaratively manage your application, handling updates and rollbacks with ease. Deployments are crucial for maintaining the desired number of replicas, managing updates to applications, and rolling back to previous versions if needed.
Setting Up Your Kubernetes Cluster:
Before we proceed with deployments, make sure you have a running Kubernetes cluster. If you haven't set one up yet, you can follow the instructions from our previous blog posts. Once your cluster is up and running, we're ready to get started.
Creating a Deployment:
- Define Your Deployment: Create a YAML file that describes your deployment. This file includes specifications for the container image, replicas, and any other necessary configurations. Here's a simple example:
apiVersion: apps/v1
kind: Deployment
metadata:
  name: my-app-deployment
spec:
  replicas: 3
  selector:
    matchLabels:
      app: my-app
  template:
    metadata:
      labels:
        app: my-app
    spec:
      containers:
      - name: my-app-container
        image: your-container-image:latest
Apply the Deployment: Use the kubectl apply command to create or update the deployment based on the YAML file you created:
kubectl apply -f your-deployment-file.yaml
Scaling Your Application:
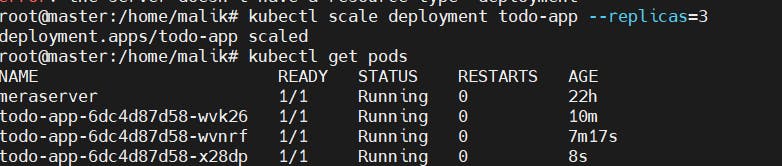
One of the powerful features of Kubernetes is the ability to scale your application effortlessly. If, for example, you want to increase the number of replicas from 3 to 5, you can use the following command:
kubectl scale deployment my-app-deployment --replicas=5
Updating Your Application:
When it's time to update your application, you can simply modify the container image in your deployment YAML file and reapply it:
kubectl apply -f your-updated-deployment-file.yaml
Rolling Back to a Previous Version:
In case something goes wrong with the update, Kubernetes makes it easy to roll back to a previous version:
kubectl rollout undo deployment my-app-deployment
What is Deployment in k8s
A Deployment provides a configuration for updates for Pods and ReplicaSets.
You describe a desired state in a Deployment, and the Deployment Controller changes the actual state to the desired state at a controlled rate. You can define Deployments to create new replicas for scaling, or to remove existing Deployments and adopt all their resources with new Deployments.
Today's task let's keep it very simple.
To-do-app Deployment with K8s:
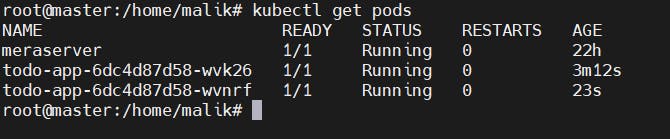
Create one Deployment file to deploy a sample todo-app on K8s using "Auto-healing" and "Auto-Scaling" feature
add a deployment.yml file (sample is kept in the folder for your reference)
apply the deployment to your k8s (minikube) cluster by command
kubectl apply -f deployment.yml
Let's make your resume shine with one more project ;)
Here are the key aspects of a Kubernetes Deployment:
Desired State
Rolling Updates and Rollbacks
Scaling
High Availability
Self-healing
Let's start by creating a deployment.yml file. This YAML file contains the configuration details of our deployment. Here's a sneak peek:
apiVersion: apps/v1
kind: Deployment
metadata:
  name: todo-app
  labels:
    app: todo
spec:
  replicas: 2
  selector:
    matchLabels:
      app: todo
  template:
    metadata:
      labels:
        app: todo
    spec:
      containers:
      - name: todo
        image: trainwithshubham/django-todo
        ports:
        - containerPort: 8000

apiVersion: apps/v1
kind: Deployment
metadata:
  name:  todo-app
  labels:
    name:  todo
spec:
  replicas: 2
  selector:
    matchLabels:
    app: todo
  template:
    metadata:
      labels:
        app : todo
    spec:
      containers:
      -name: todo
       image: trainwithshubham/django-todo
       ports:
       - containerPort: 8000
         port:  Port
         protocol: TCP
Conclusion:
Congratulations on launching your Kubernetes cluster with deployment! With this fundamental concept, you're now equipped to manage, scale, and update your applications seamlessly. As you continue your Kubernetes journey, keep exploring other features and best practices to enhance your container orchestration skills. Stay tuned for more exciting topics on our Kubernetes adventure!


