

Day 11 : Advance Git & GitHub for DevOps Engineers: Part-2


What is Git Stash?
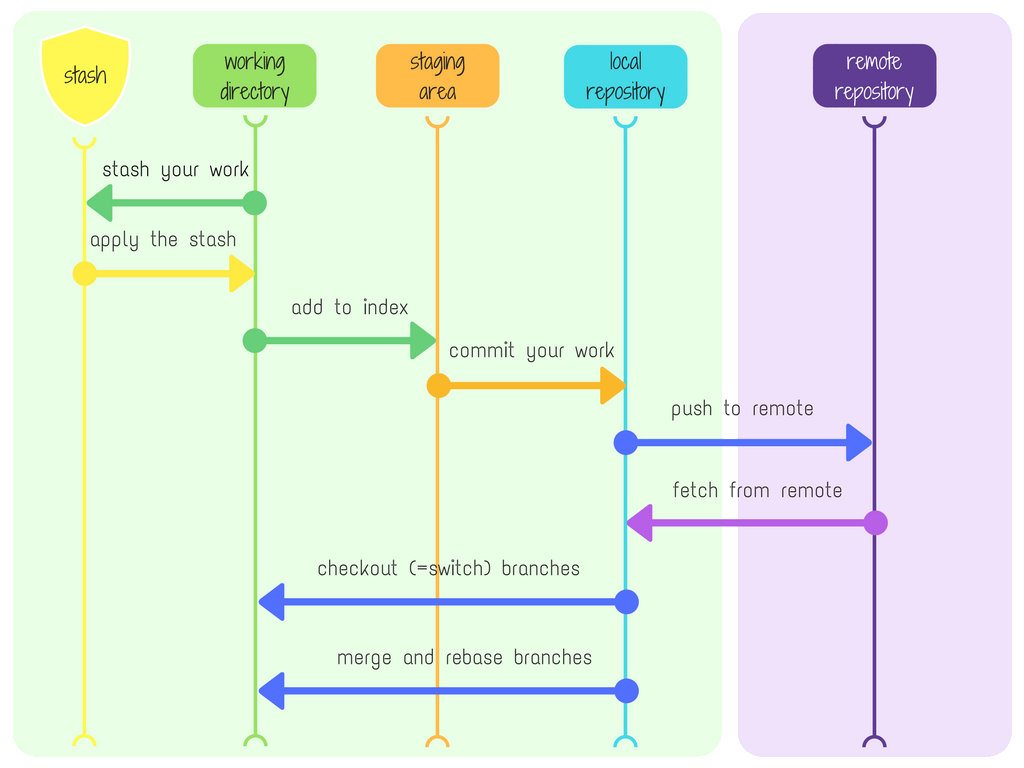
Git stash is a helpful command in Git that enables you to temporarily store changes you've made in your working directory without committing them. This is particularly useful when you're working on a task in your current branch but need to switch to another branch for a different task, without committing incomplete changes.
Let's see an example scenario with commands:
Create a New Branch and Make Changes:
 git checkout -b devops  # Create a new branch named 'devops'
 # Make changes to files in your working directory
Save Changes Using Git Stash:
git stash # Save the changes in the working directoryThis command will temporarily remove the changes from your working directory and store them in a stash, allowing you to switch branches without carrying the changes along.
List Stashed Changes:
git stash list # View the list of stashed changesYou'll see a list of all stashed changes, along with unique identifiers for each stash.
Apply Stashed Changes:
git stash apply # Apply the most recent stashThis command reapplies the most recent stash to your working directory, allowing you to continue working on the changes you had stashed.
Delete a Stash:
git stash drop # Delete the most recent stashYou can use this command to remove the most recent stash from the list if you no longer need it.
Clear All Stashes:
git stash clear # Delete all stashesIf you want to remove all stashed changes, you can use this command.
By utilizing Git stash, you can effectively manage your work-in-progress changes, switch between branches seamlessly, and maintain a clean and organized development workflow.
Cherry-pick:
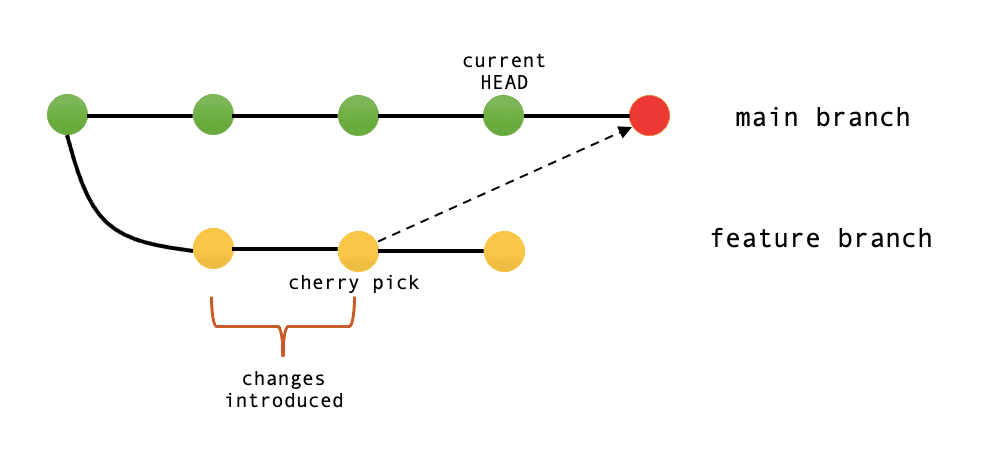
Cherry-pick is a Git command that allows you to select specific commits from one branch and apply them to another branch. This is useful when you want to pick specific changes from one branch and apply them to another branch without merging the entire branch.
Here's an explanation with an example:
Suppose you have two branches in your Git repository: 'feature' and 'master'. You've made some commits on the 'feature' branch that you want to apply to the 'master' branch.
Identify the Commit to Cherry-Pick: First, you need to identify the commit or commits you want to cherry-pick. You can use
git logto view the commit history and find the commit hashes.Cherry-Pick the Commit: Once you've identified the commit, you can cherry-pick it using the
git cherry-pickcommand followed by the commit hash:git cherry-pick <commit-hash>For example:
git cherry-pick abc123This command will apply the changes from the specified commit onto your current branch (in this case, 'master').
Resolve Conflicts (if any): If there are any conflicts between the changes in the cherry-picked commit and the existing code in your current branch, Git will prompt you to resolve them. You can resolve conflicts manually and then continue the cherry-pick process.
Complete the Cherry-Pick: After resolving conflicts (if any), Git will complete the cherry-pick process. The changes from the cherry-picked commit will now be applied to your current branch.
Repeat for Additional Commits (if needed): If you want to cherry-pick multiple commits, you can repeat the process for each commit by specifying their respective commit hashes.
Cherry-pick is a powerful tool for selectively applying changes from one branch to another, allowing you to incorporate specific features or bug fixes without merging entire branches. However, it's important to use cherry-pick carefully to avoid conflicts and maintain a clean project history.
Resolving Conflicts:
Suppose we have two branches, 'feature' and 'main', and we're trying to merge changes from the 'feature' branch into 'main', but conflicts arise:
Identify Conflicts:
git merge featureThis command initiates the merge process, but if conflicts occur, Git will pause and indicate which files have conflicts.
View Conflicts:
git statusThis command shows a list of files with conflicts. You'll see something like:
 Unmerged paths:
   (use "git add <file>..." to mark resolution)
         both modified:   devops.txt
Understand Differences:
git diff devops.txtThis command shows the differences between the conflicting versions of the file 'devops.txt', highlighting the conflicting changes.
Resolve Conflicts: Open 'devops.txt' in a text editor and manually edit the file to resolve the conflicts. Remove the conflict markers (<<<<<<<, =======, >>>>>>>) and make the necessary changes to reconcile the conflicting changes.
Mark Conflicts as Resolved: After resolving the conflicts, stage the resolved file:
git add devops.txtThis command marks 'devops.txt' as resolved and ready to be included in the commit.
Complete the Merge:
git merge --continueThis command tells Git to proceed with the merge process using the resolved files. If there are multiple conflicted files, repeat steps 3-5 for each file.
Following these steps, you can successfully resolve conflicts during the merge process in Git using the 'devops.txt' file. Remember to carefully review the changes and ensure that the resulting code is correct before finalizing the merge.
TASK 01:
Create a New Branch and Make Changes:
 git checkout -b feature-branch  # Create a new branch named 'feature-branch' and switch to it
 # Make some changes to files in your working directory
Use Git Stash to Save Changes:
git stash # Save the changes in the working directory without committing themThis command will temporarily store the changes you made in the 'feature-branch' branch.
Switch to a Different Branch, Make Changes, and Commit:
 git checkout main  # Switch to a different branch, e.g., 'main'
 # Make some changes to files in your working directory
 git add .  # Stage the changes
 git commit -m "Commit changes on main branch"  # Commit the changes
Use Git Stash Pop to Apply Stashed Changes:
git stash pop # Bring back the changes saved in the stash and apply them on top of the new commitsThis command will apply the changes you stashed earlier on top of the new commits you made on the 'main' branch. If there are conflicts, you'll need to resolve them manually.
By following these steps, you've successfully used Git stash to save changes in one branch, switched to another branch to make and commit changes, and then applied the stashed changes on top of the new commits. This allows you to manage changes across different branches efficiently.
TASK 02:
Sure, let's break down the steps for Task-02:
Switch to Development Branch:
git checkout developmentEdit version01.txt: Open version01.txt and add the following lines after "This is the bug fix in development branch":
"After bug fixing, this is the new feature with minor alteration This is the advancement of previous feature Feature 2 is completed and ready for release"Commit Changes:
 git add version01.txt
 git commit -m "Added feature2.1 in development branch"
Commit Second Set of Changes:
 git add version01.txt
 git commit -m "Added feature2.2 in development branch"
Commit Final Changes:
 git add version01.txt
 git commit -m "Feature2 completed"
Switch to Production Branch:
git checkout productionRebase Production Branch:
git rebase masterResolve Conflicts (if any): If there are any conflicts during the rebase process, resolve them and continue with the rebase using
git rebase --continue.
By following these steps, you'll have added new features to the development branch and then rebased the production branch onto the master branch to reflect the commit messages from the development branch. This helps to keep the commit history consistent across branches and ensures that the changes are applied correctly in the production environment.
TASK 03:
Sure, here are the steps for Task-03:
Switch to Production Branch:
git checkout productionCherry-pick the Desired Commit: First, identify the commit hash of "Added feature2.2 in development branch". Let's assume the commit hash is
123abc. Then, cherry-pick this commit onto the production branch:git cherry-pick 123abcThis command will apply the changes from the specified commit onto the production branch.
Edit version01.txt: Open version01.txt and add the following line after "This is the advancement of previous feature":
Added few more changes to make it more optimized.Commit the Optimized Feature:
 git add version01.txt
 git commit -m "Optimized the feature"
By following these steps, you've cherry-picked the desired commit onto the production branch and added additional changes to optimize the feature. Finally, you've committed the optimized feature with an appropriate message.